Tuesday, January 20, 2015
Building Form Corrections
Its been really hot here in Austin for the last month. Working in the garage, even with the portable air conditioner going, can get pretty uncomfortable after a while. Add to that a need to spend a bunch of time working close to the floor, and this older mans body starts complaining. It gets easy to find excuses not to do something or to take longer to accomplish a specific task. Add to that my normal tendency to delay when I am unsure of something and you end up not seeing a lot of work completed. That has been August.
But I am glad to say that I am 95% completed on the building form structure. I have to add a few more pieces of cardboard under the structure to protect the garage floor and I may add a few diagonal braces on some of the legs, but I feel like I can now begin mounting boat parts to the form.
Along the way, I had to make some adjustments. The form required additional leveling and I found that my original plan for attaching the structure to the floor was inadequate. I had started off with "L" brackets mounted in the center of four of the legs and attached to the floor using concrete expansion bolts.
These were fairly easy to install, I started out buying predrilled "L" brackets already bent. These are the same types used in house construction. They were fairly expensive at a bit of 4 dollars apiece. I had to increase the hole sizes to accommodate the hardware I was using.
Using the "L" bracket, you mark the hole in the concrete and then drill a small hole of the required size into the concrete using a rotary drill hammer (rented from Home Depot) and a concrete drill bit (also rented). Then concrete expansion bolts are hammered into the hole. The "L" bracket is mounted to the expansion bolt and then the bracket is screwed to the building form legs using lag screws.
Anyway, these original four brackets were not sufficient to keep the form from being rocked side to side. So I went out to buy enough brackets for each leg to have two brackets. That would have required an additional 8 of those 4 dollar brackets. Pretty pricey!. Fortunately, I happened to notice some straight straps that were also pre drilled. I determined that I could bend these to a 90 degree angle in my bench vise. They were only a bit under 2 dollars a piece.
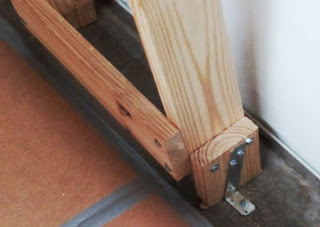
I moved the original brackets to the sides and added the additional brackets so I ended up with two per leg on all six form legs. This was much better and the form now cannot be rocked from side to side.
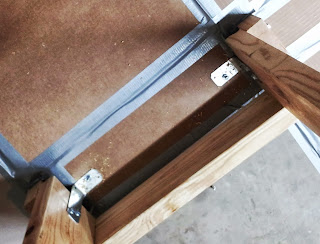
I also wanted to protect my garage floor from epoxy resin drips when I get back into the build, so Ive added cardboard to the floor, held in place with duct tape. Needless to say, this required a bunch of time on my knees and they are complaining as a result of this.
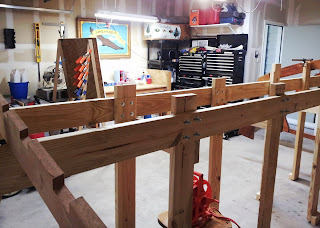
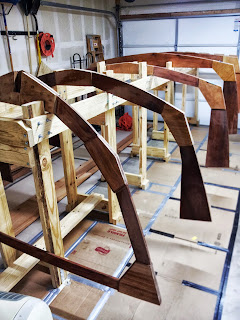
However, as mentioned, the form is now ready for the next phase of construction. Here are a few updated shots. The first two are earlier shots but they give some sense of the amount of workspace I have. It looks like a lot in the photos but with all the frames added, the garage is somewhat cramped. The wall with the yard tools is pretty close to the boat structure. There is enough room but just barely.
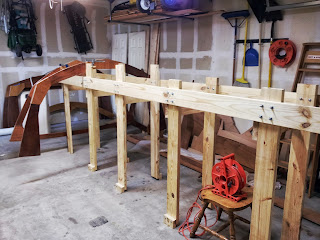
The remaining shots how the completed structure. In the first photo you can see a long horizontal piece near the floor going out towards the wall. This will be where the stem mounts when it is added. There will be more on adding the frames and boat structure in a future blog posting.

About the only remaining thing I want to do is add a bit more cardboard in the center on the floor and add a few diagonal leg braces on some of the legs. The structure is pretty stiff but the braces would remove any remaining flex.
The next step will be to start mounting the boat structure to the form (finally!!). That requires leveling, measuring, and other activities which I will cover another time.
Take care.
But I am glad to say that I am 95% completed on the building form structure. I have to add a few more pieces of cardboard under the structure to protect the garage floor and I may add a few diagonal braces on some of the legs, but I feel like I can now begin mounting boat parts to the form.
Along the way, I had to make some adjustments. The form required additional leveling and I found that my original plan for attaching the structure to the floor was inadequate. I had started off with "L" brackets mounted in the center of four of the legs and attached to the floor using concrete expansion bolts.
These were fairly easy to install, I started out buying predrilled "L" brackets already bent. These are the same types used in house construction. They were fairly expensive at a bit of 4 dollars apiece. I had to increase the hole sizes to accommodate the hardware I was using.
Using the "L" bracket, you mark the hole in the concrete and then drill a small hole of the required size into the concrete using a rotary drill hammer (rented from Home Depot) and a concrete drill bit (also rented). Then concrete expansion bolts are hammered into the hole. The "L" bracket is mounted to the expansion bolt and then the bracket is screwed to the building form legs using lag screws.
Anyway, these original four brackets were not sufficient to keep the form from being rocked side to side. So I went out to buy enough brackets for each leg to have two brackets. That would have required an additional 8 of those 4 dollar brackets. Pretty pricey!. Fortunately, I happened to notice some straight straps that were also pre drilled. I determined that I could bend these to a 90 degree angle in my bench vise. They were only a bit under 2 dollars a piece.


I moved the original brackets to the sides and added the additional brackets so I ended up with two per leg on all six form legs. This was much better and the form now cannot be rocked from side to side.
I also wanted to protect my garage floor from epoxy resin drips when I get back into the build, so Ive added cardboard to the floor, held in place with duct tape. Needless to say, this required a bunch of time on my knees and they are complaining as a result of this.
However, as mentioned, the form is now ready for the next phase of construction. Here are a few updated shots. The first two are earlier shots but they give some sense of the amount of workspace I have. It looks like a lot in the photos but with all the frames added, the garage is somewhat cramped. The wall with the yard tools is pretty close to the boat structure. There is enough room but just barely.


The remaining shots how the completed structure. In the first photo you can see a long horizontal piece near the floor going out towards the wall. This will be where the stem mounts when it is added. There will be more on adding the frames and boat structure in a future blog posting.


About the only remaining thing I want to do is add a bit more cardboard in the center on the floor and add a few diagonal leg braces on some of the legs. The structure is pretty stiff but the braces would remove any remaining flex.
The next step will be to start mounting the boat structure to the form (finally!!). That requires leveling, measuring, and other activities which I will cover another time.
Take care.
Subscribe to:
Post Comments (Atom)
No comments:
Post a Comment